Showing posts with label Scrappingville. Show all posts

Saturday, June 30, 2012

Monday Tutorials for Scrappingville in July

Good day everyone! It's another monday tutorial for you here! I would like to present you a layout that involves four photos but still making it easy.

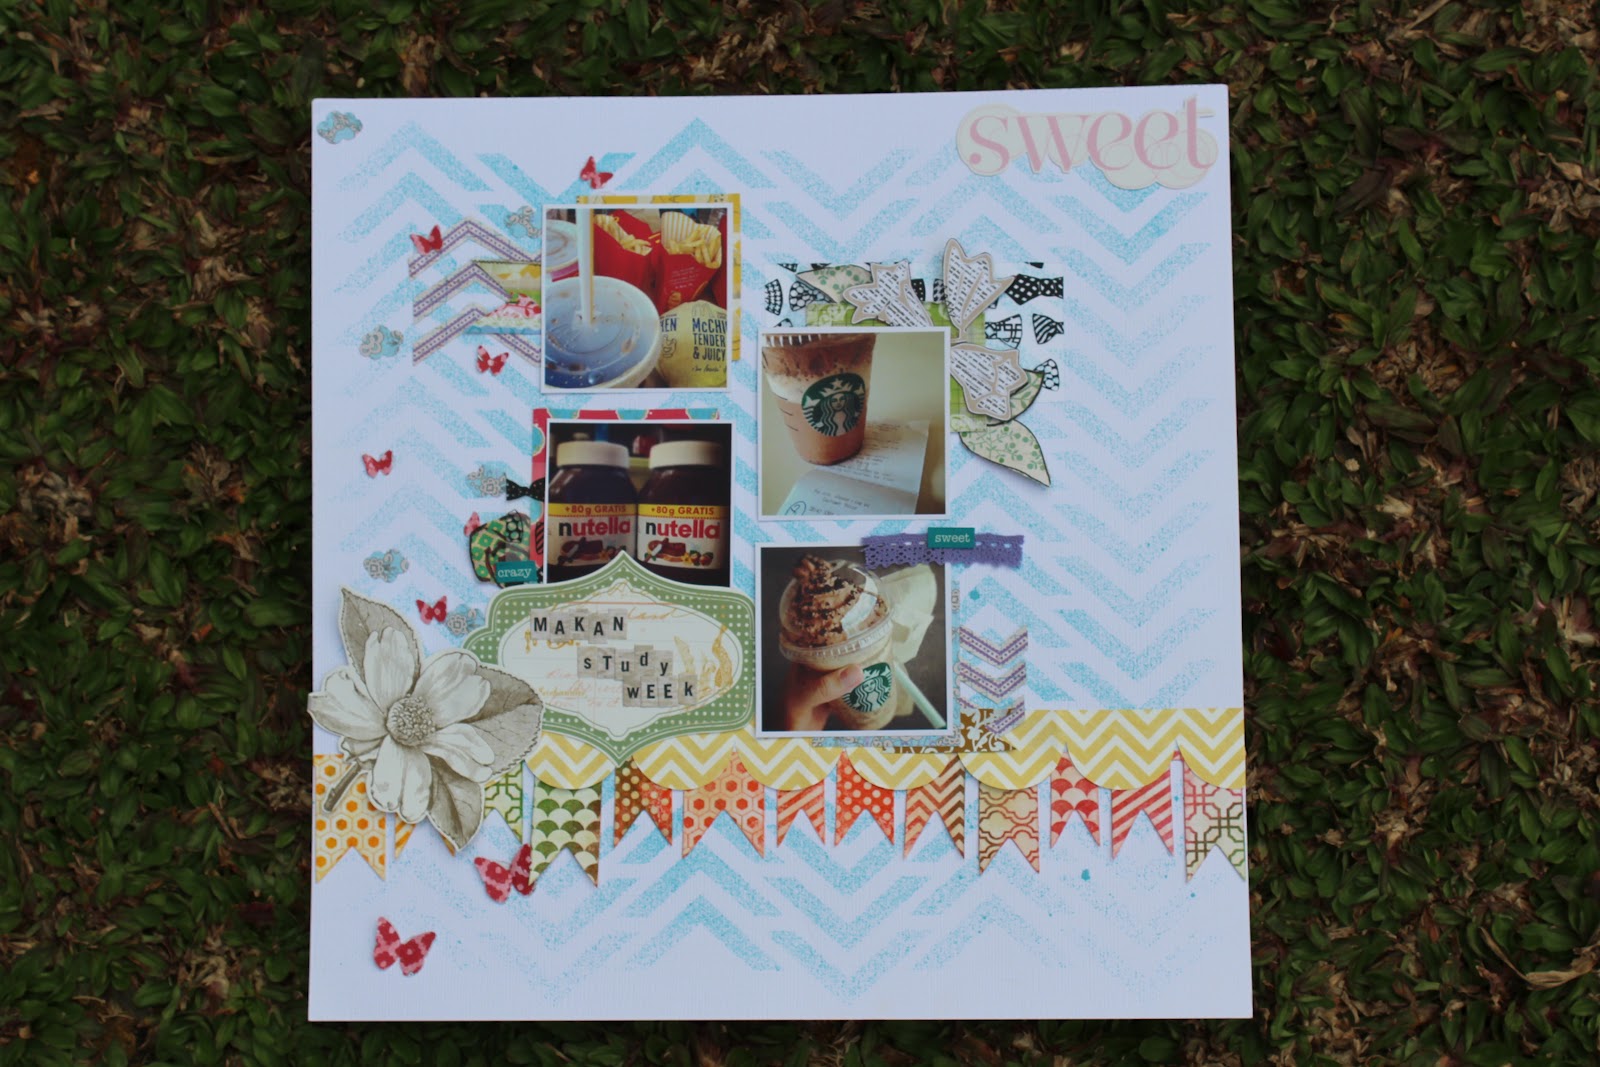
First, mist the white cardstock in blue by using a 12"x12" stencil, you could get a good quality stencil from The Crafters Workshop. Then use two types of banners, one scalloped and another one which is alterable by Heidi Swapp's latest collection, stick them at the bottom of the page by overlapping them.

Arrange your photos as you wish, you could use any amount of photos of course! Here I'm using 4 instead. When you are happy about it, matte your photos with different pattern papers but it should be smaller than your photos, so that it would turn out fun! You could even fussy cut different images out from pattern papers, here I'm using the plants, flowers and chevrons by She Art from Pink Paislee.

Select a space to stick your die cut bracket from Pink Paislee's Nantucket diecut, then write or stick alpha stickers for your title. I also added some more die cuts like the "Sweet" word and flower here and there.
Just a few things prepared and you are successful with one more layout! Enjoy scrapping! Remember to get everything you need here from Scrappingville store!


Thursday, June 28, 2012

Monday Tutorials 02.07.2012

Hi again, and I'm back with Monday Tutorials for you! For June, there are some Pink Paislee's She Art and Nantucket, Hambly Screen Prints and Heidi Swapp's mistable banners! The layout I'm going to share today is this:


First, I used Yellow, Maroon and Orange mist to colour a banner from Heidi Swapp's, then cut extra banners from one of the She Art papers. Glue them down on top of an American Crafts' glitter cardstock.

Punch out stars and glue them on the bottom of the page.


Cut a smaller piece from Hambly screen's Bow Tie for the 'door' of the centre and use a small piece of washi tape to adhere down to the page. I added glue between the tape and the cardstock for stronger adhesion. Then use Pink Paislee's She Art papers and Nantucket's die cuts to decorate the 'door', here I cut banners, borders and bow out from papers. and layer with some more die cuts.


After making the 'door', place another Hambly Screen Print paper with the exact same size with the 'door' beneath it. Stick your photo on it, and add more washi tape if you wish too. I cut out more flowers from the She Art paper and embellish the backside of the 'door' and on the base.


Embellish your photo on the base with some flower die cuts, punched out butterflies and word stickers. You could use anything with bright colours on hand to embellish, bright colours shows nicely against the black glitter cardstock.


All products including papers, stickers, die cuts, transparencies, mistables and ribbons are available in Scrappingville shop. Come on over to get everything you need and start a new layout!

Monday, April 30, 2012

April layout for Scrappingville and Pretty Little Studio's new line


Hello everyone, I'm blogging another MONDAY TUTORIALS today! We'll be incoporating mix-media with a scrapbooking layout, hope you have fun with this :)
Apply a layer of gesso on your white cardstock, a thin layer will do. Once dry, use circle and sun template (or any other templates will do) and add a thick modeling paste for a good coverage and let it dry.
When the modeling paste is completely dry, spray water onto your layout. Pick your favourite mist and spray them on the water, then spray water onto your mist again to get a watercolour effect. Concentrate your colour spraying especially on the modeling paste. Becareful of water dripping out from your layout, it gets very messy here :)
Leave your layout to dry and once dried you'll have something that looks like this. It will turn out to be a watercolour effect.
I didn't like the ugly circle effect on the left, so I covered it up with a big similar to polaroid style photo there and start adding stickers here and there.
Added a banner sticker on the left top corner with some stamped birds flying around.

A bicycle sticker on the right bottom and used alpha stickers to spell the phrase out at the same area. Play with different styles of phrasing :)
More cute element stickers were added around the polaroid plus some layerings. Punched out hearts and backed with a different patternpaper.

Double and triple layered the balloons for a super dimensional look, because the layout is uneven.
Hand cut your own letterings for title on pattern paper, they are more unique than Thickers! You can use a die cutting machine like the Sillhouette if you own one :)
There you have it, hope you have fun with the mix media idea :)

Get pattern papers and sticker sheets at Scrappingville shop where everything is available there!!!
------------------------------------------------------------------------------------------------------------------------

Melissa allowed us to show everyone the behind the scene's of another new line coming up... spend your lovely summer with this new line with pastel bicycles, butteflies, sand castles and hexagons! more die cut flashcards for you too! They'll sure make your day :)
They will be available very very soon, I'll promise :)
Please don't be silly by missing the current MONSIEUR line :DDD it is equivalently stunning!!! Go to the shop and at least get the vintage man stickers and tags for goodness sake, hahahaah :)))

Friday, March 2, 2012

MONDAY TUTORIALS! for Scrappingville


Hi there! Just in case you don't know, from now on I will be hosting MONDAY TUTORIALS on Scrappingville's blog every Monday! Sharing some tips and ideas about projects made for my local scrapbooking store.
Come on over to take a look and let me know if there is anything needed to be improved!! :D

I used Basic Grey products for last week and maybe you could get some ideas if your papers are still hiding in one of your CropperHoppers??? :)

Thanks for coming over!!!!!!

Friday, February 17, 2012

February project for Scrappingville


It's time to share projects made for Scrappingville on February!

the hues for this month is bright, cheerful and more of spring colors. Totally love those!!! and you see that flower stickers and glitter thickers??? thumbs up!
I prepared two layouts with this kit, you can see they have similar characteristics.. haha!

----------------------------------------------------

Layout ONE!


I framed up the entire layout with the scallop craft paper for a complete look. Lots of confettis here for an extra 'in the air' look and butterflies hanging on the ribbon for some dimension. ooo... a flower sticker for a pop please! :) I did some ink splatters using the Lemonade Mister Huey too and it turn out well.
some stitching is needed here for textures, i used brown thread for the loop... and oh more confettis!!!


here is the layering part. with self made tags, banners, ripped papers... doily, tab and a 'knot' ribbon on top.... tuck in whatever I can think of here

butterflies with bright colors on blue ribbon, definitely cute and irresistable!!! gotta try those :D


-----------------------------------------------------

Layout TWO!!


the bright colors and glitter reminds me of PARTIES
so I made hanging banners and pennants for the next layout...super cheery and extra happiness
the GCD studios flower stickers (called Cabochons) are working good here for a pop!


if you look closely, I twisted the ruffle ribbon for extra dimension and sticked different banners and pennants on it... i added the red check ribbon for a banner for some texture

alas i framed the layout half with the brown lace ribbon, i just think i have to do that.
the teal glitter foam thickers is just AWESOME MARVELOUS SPLENDID STUNNING and WONDERFUL!!!!!!! I love it love it love it!!!! not to mention how great the glitter is.... the foam thickers can be stacked for more dimension!!!! it gives a different look rather than the plain boring title... give it a try :)))

Come on over to Scrappingville to see them in person and of course more projects from other DTs (those are sooooooooooooo beautiful *faint*~)!! All products can be found in Scrappingville too.

Materials:
Cardstock -- Bazzil Basics White
Pattern Paper -- American Crafts': Botanique Collection(Vivian)(Blanche) (Patsy), Confetti collection (Suzie Strawberry), LOVE Collection (Falling), Sassafras: Monstrosity collection (Spot on)
Ribbon -- American Crafts': LOVE Premium Ribbon
Flower Stickers -- GCD Studios: FUNHOUSE Caabochons
Alpabets -- DearLizzy+American Crafts: FANCY glitter foam thickers


Monday, February 13, 2012

January project for Scrappingville


wootsie~ here to share projects made for Scrappingville on January!!
here's how the kit looks like_____


the Skipping paper (the wordpuzzle one) from Basic Grey's Hopscotch collection is awesome! I made a hollow, one alpha thick frame behind my photo, so I can do whatever I want inside. there are tons of images on the Kissing Tag paper... from butterflies to heart shapes and scallop flowers!!! fussy cut to your heart's content and cluster them around the frame. the lil' banner bellow the title was used from the backside of the exact same paper too :) with a strand of Pink Paislee Soiree twine, a small flower brad from Dear Lizzy collection and some Distress ink on the side, it is done :)


I used TCW's Balzer Designs' stencil as a template to mist with orange, pink and light blue mist. using the Kissing Tag paper from Hopscotch collection again... I made the little flowery thingy looked as if they're falling down... same ol' twine, brad and alpha stickers from Basic Grey too... another layout was made!!!


Materials:
Cardstock: Bazzil Basics white
Pattern paper: Basic Grey's Hopscotch collection
Brad: Dear Lizzy flower brad
Twine: Pink Paislee: Soiree collection twine
Distress Ink: Mustard Seed
Stamps: Hero Arts+Basic Grey: Sweet Threads collection

Sunday, January 29, 2012

SUPER SIMPLE LO and 1st kit

another layout tht should be shared for quite some time ago --> last year i meant.
this one is super easy super simple and super fast. Thanks to the help of Pink Paislee's Daily Junque paper, i love it! yes, that's me in the photo when I was young, please don't try to squint for a clearer look of me, ha!
cut out flowers from Studio Calico's Memoir paper and other Daily Junque papers, cute! and just staple the cut out from the same line. ah! so easy.
this little vintage lady with an umbrella is from MME's Lost & Found 2 Stamp set. the label on the paper just came in too handy, oh my, I DONT HAVE TO THINK TOO MUCH :D
the Studio Calico intertwined circles die cut sheet is something I've been dying for to do this--->the masking technique!!!!! (with Dewey Mister Huey) the die cut rocks baby!!


anyway, I brought my friends to Scrappingville (LSS in Kuala Lumpur,Malaysia) to make their very 1st layout. oh yeah, they enjoyed.
and I got my first DT kit from Scrappingville with soooo many Hopscotch paper by Basic Grey. you know what? I've finished my projects within 2 days with 2 layouts, ha! I call this efficient me :D