Showing posts with label Tutorial. Show all posts

Wednesday, March 27, 2013

waisam&cheryl: SEEING DOUBLE


this is funny and random, as we are having a simple bloghop here, haah. basically its just me and WAI SAM sharing the so called MATCH BOOKS inspired by one of the 2 peas video. But I think it looks more of like American Craft's Remarks sticker book idea instead!

WAI SAM and I used the exact same title, photos, idea and theme for the album. 
It's just the materials and style differs :))) do click and see her version :D

Here it's mainly from the Pink Paislee's Portfolio collection, and the collection's design is perfect for this. Then there are some washi tapes, other 6" x 6" papers, stickers, food packaging, alpha stickers etc etc etc etc 

We have the same title. I have no space left for an S behind the "SCRAPPER" hahaha, so be it~


The 1st page looks like this. The tag with the bronze splatter behind the skyscrapper stamp is just big splotches of Distress Stain, click here --> TUTORIAL to see how WAI SAM does it. she even has a short video on Vine
coooooool

 I love this page, I sprayed ink on the rubber stamp (from waisam hahah) and stamp onto kraft cardstock. it looks like printed paper bags :) ITS MY JAM stamp is just so wonderful, and WAI SAM is loving it so much too, since we snag it for USD5 + 40% off from Kelly Purkey's shop. Do you see the *pom-pom like toothpick* there? I made it myself! I shall show you how to make it soon.

 PAPERMARKET! a bad place to go if you have your wallet with you.

WAISAM treated me dinner *gandong* *tq*
i added the Heidi Swapp frills thingy in between the pages.


WAI SAM seriously have to cut down on sweet stuffs. she is crazy. mad lady.

Day 2. Breakfast with WAISAM the sweettooth.

 WAISAM's house!!!! with 2 cute dogs. I was riding on giant JUNIOR when no one noticed. hahahaha
SASHA the black dog was too hyper, bye

Finally I get to use DOGS STUFF!!!! dog sticker, dog veneer, dog clips, stick stick stick

WAI SAM must be feeling shiok when she sees the last page

I am no perfectionist, I couldnt stick the washi tape well on the bone of the album.
whatever
It's a full 12" x 12" paper w/o cutting off the barcode strip.

Thanks for looking :)))

Saturday, June 30, 2012

Monday Tutorials for Scrappingville in July

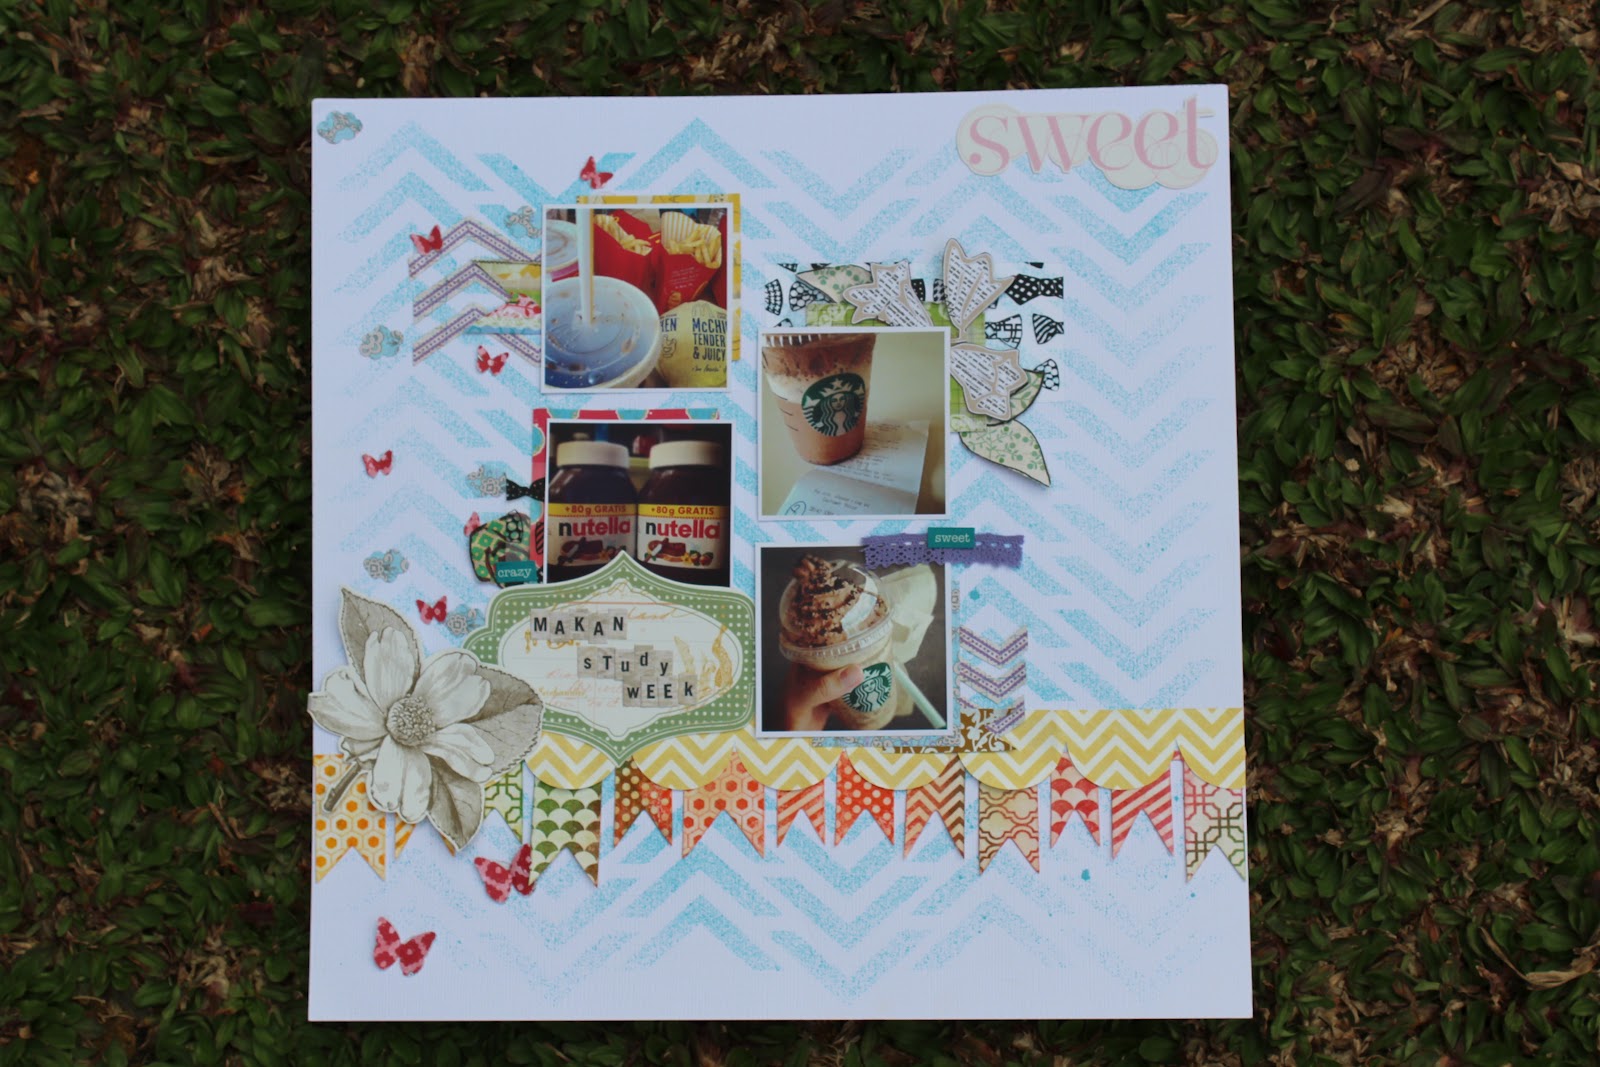
Good day everyone! It's another monday tutorial for you here! I would like to present you a layout that involves four photos but still making it easy.

First, mist the white cardstock in blue by using a 12"x12" stencil, you could get a good quality stencil from The Crafters Workshop. Then use two types of banners, one scalloped and another one which is alterable by Heidi Swapp's latest collection, stick them at the bottom of the page by overlapping them.

Arrange your photos as you wish, you could use any amount of photos of course! Here I'm using 4 instead. When you are happy about it, matte your photos with different pattern papers but it should be smaller than your photos, so that it would turn out fun! You could even fussy cut different images out from pattern papers, here I'm using the plants, flowers and chevrons by She Art from Pink Paislee.

Select a space to stick your die cut bracket from Pink Paislee's Nantucket diecut, then write or stick alpha stickers for your title. I also added some more die cuts like the "Sweet" word and flower here and there.
Just a few things prepared and you are successful with one more layout! Enjoy scrapping! Remember to get everything you need here from Scrappingville store!


Thursday, June 28, 2012

Monday Tutorials 02.07.2012

Hi again, and I'm back with Monday Tutorials for you! For June, there are some Pink Paislee's She Art and Nantucket, Hambly Screen Prints and Heidi Swapp's mistable banners! The layout I'm going to share today is this:


First, I used Yellow, Maroon and Orange mist to colour a banner from Heidi Swapp's, then cut extra banners from one of the She Art papers. Glue them down on top of an American Crafts' glitter cardstock.

Punch out stars and glue them on the bottom of the page.


Cut a smaller piece from Hambly screen's Bow Tie for the 'door' of the centre and use a small piece of washi tape to adhere down to the page. I added glue between the tape and the cardstock for stronger adhesion. Then use Pink Paislee's She Art papers and Nantucket's die cuts to decorate the 'door', here I cut banners, borders and bow out from papers. and layer with some more die cuts.


After making the 'door', place another Hambly Screen Print paper with the exact same size with the 'door' beneath it. Stick your photo on it, and add more washi tape if you wish too. I cut out more flowers from the She Art paper and embellish the backside of the 'door' and on the base.


Embellish your photo on the base with some flower die cuts, punched out butterflies and word stickers. You could use anything with bright colours on hand to embellish, bright colours shows nicely against the black glitter cardstock.


All products including papers, stickers, die cuts, transparencies, mistables and ribbons are available in Scrappingville shop. Come on over to get everything you need and start a new layout!

Wednesday, June 20, 2012

Mom's Day Card crazy tutorial for PLS!!

I tried to make some magic (hahaha :) ) by using some Pretty Little Studios products to make a card for my mom. Hope this tutorial inspires you to make a card too :)
We'll first prepare a spiral heart for the card.
Cut two pieces from Timeless paper with the exact size. Mine was 3" x 3".

Apply glue on the back side of one of the square paper.
You will have a double sided paper now!
Draw a heart shape on the paper.
Cut the shape out and you'll have a double sided pattern heart.
Trace a spiral heart with a pencil.
Follow the spiral and cut it, you'll have a spiral heart now.
Next, we'll be making a dimensional doily flower.
Fold a doily into half, but not creasing it. Just lightly press the doily in the middle and add some glue inside the folded doily. You'll have to becareful by not pressing it, or else the doily would not turn out dimensional.
Foldfrom the right to the left side about three quarters and add a bit of glue again. Remember not to press the doily or crease it, just press it in the middle will do :)
Make another 3 with the same steps, and layer all four side by side sticking them down to the right side of the card.
Stick the center of the spiral heart to the centre of the doily.
You could add a circle tag to the spiral heart if you want too.
I added a calendar card on the left, then stick the ends of the spiral heart on top.
Fussy cut some flowers from the Keepsakes paper Classics and paper, stick them arond your doily flower.
You know how awesome the Pretty Little Studio products are for a card, so use them to embellish the entire card. Good to give my mom now!
Product used:
Keepsakes paper (Antique store)
Timeless paper (Antique store)
Classic paper (Antique store)
Starburst number tags
Peter rabbit vintage circle tags 1"
Monsieur calendar cards
Monsieur journaling cards

Monday, April 30, 2012

April layout for Scrappingville and Pretty Little Studio's new line


Hello everyone, I'm blogging another MONDAY TUTORIALS today! We'll be incoporating mix-media with a scrapbooking layout, hope you have fun with this :)
Apply a layer of gesso on your white cardstock, a thin layer will do. Once dry, use circle and sun template (or any other templates will do) and add a thick modeling paste for a good coverage and let it dry.
When the modeling paste is completely dry, spray water onto your layout. Pick your favourite mist and spray them on the water, then spray water onto your mist again to get a watercolour effect. Concentrate your colour spraying especially on the modeling paste. Becareful of water dripping out from your layout, it gets very messy here :)
Leave your layout to dry and once dried you'll have something that looks like this. It will turn out to be a watercolour effect.
I didn't like the ugly circle effect on the left, so I covered it up with a big similar to polaroid style photo there and start adding stickers here and there.
Added a banner sticker on the left top corner with some stamped birds flying around.

A bicycle sticker on the right bottom and used alpha stickers to spell the phrase out at the same area. Play with different styles of phrasing :)
More cute element stickers were added around the polaroid plus some layerings. Punched out hearts and backed with a different patternpaper.

Double and triple layered the balloons for a super dimensional look, because the layout is uneven.
Hand cut your own letterings for title on pattern paper, they are more unique than Thickers! You can use a die cutting machine like the Sillhouette if you own one :)
There you have it, hope you have fun with the mix media idea :)

Get pattern papers and sticker sheets at Scrappingville shop where everything is available there!!!
------------------------------------------------------------------------------------------------------------------------

Melissa allowed us to show everyone the behind the scene's of another new line coming up... spend your lovely summer with this new line with pastel bicycles, butteflies, sand castles and hexagons! more die cut flashcards for you too! They'll sure make your day :)
They will be available very very soon, I'll promise :)
Please don't be silly by missing the current MONSIEUR line :DDD it is equivalently stunning!!! Go to the shop and at least get the vintage man stickers and tags for goodness sake, hahahaah :)))